I explain the differences between the various autopilot features you can use to drive a boat.
These days, I frequently find myself communicating with other boaters about various autopilot features. In most of these discussions, I’ve come to realize two things:
- Some boaters don’t know about all of the different ways that their chartplotters and autopilots can be used to drive the boat.
- Some boaters don’t understand the differences between the various autopilot features.
It’s my goal in this post to clear up the confusion.
My Setup
Before I begin, I’d like to take a moment to explain my setup. If your setup doesn’t match mine, don’t despair. Most of what I’ll discuss in this post will apply to any modern autopilot system, although the names of features may vary.
My boat came with three Garmin GPSMap 7612 chartplotters. (One is actually an XSV model and my understanding is that it’s the one that talks to the sonar setup.) There are two at the main helm inside and one up on the command bridge. These chartplotters are networked so they all talk to each other. Set up the autopilot on one and it’ll show up on the others.
I also have two Garmin autopilot units — one at each helm. They’re networked in with the chartplotters.
To use various autopilot features, I use these various devices. I’ll get to that a bit in my discussion of the features.
Autopilot Features
Autopilot is basically a computerized system that can control the boat’s steering. You tell it what to do and it does it.
The autopilot features I have available to me, in order of complexity, include Heading Hold, Go To, Route To, Auto Guidance, and Follow Track. I also have a bunch of pattern features, like the ability to circle or zigzag or make a search pattern, but I’m not going to discuss any of that here. I’m going to focus on the features that I use to actually drive the boat.
Heading Hold

I engage, fine tune, and disable Heading Hold right on my autopilot screen. The buttons across the bottom are (l-r): Standby, which puts the autopilot in standby mode; Port 1° or 10° (push to get 1°, hold to get 10°); Menu, which brings up a menu of options; Starboard 1° or 10°; and Power On/Off.
Heading Hold is probably the autopilot feature I use most. Once engaged, it locks the boat on a specific heading. I can fine tune that heading by pressing Port or Starboard buttons to change the heading one or ten degrees at a time.
What I like about Heading Hold is that it pretty much keeps the boat on a straight course. It steers the boat better than I can manually while under way. (It’s still easier to hand steer in tight spaces or when maneuvering at slow speeds, like in a marina.)
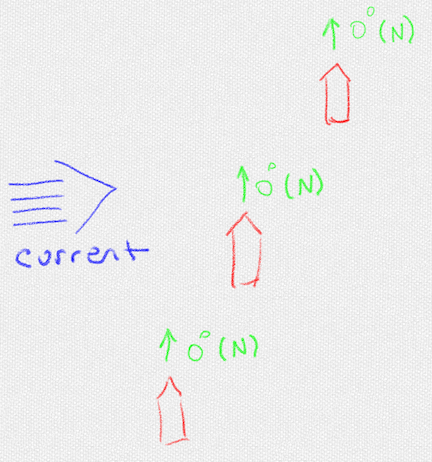
As (poorly) illustrated here, heading hold just points the boat in a direction you specify. Wind or current can still blow it “off course” because it is not on a course. It’s on a heading.
The trouble with Heading Hold is that although it keeps the boat pointed in a specific direction, it does not take the boat to a specific point up ahead. If wind or current is coming from the starboard side, for example, the boat will drift to port while still pointed at the compass heading you specified. You’ll seem to be “off course,” but you never actually created a course. You just told the boat which way the bow should point. So you can’t use Heading Hold to go to a specific place.
Go To
That’s what Go To is for. It takes you to a specific place.
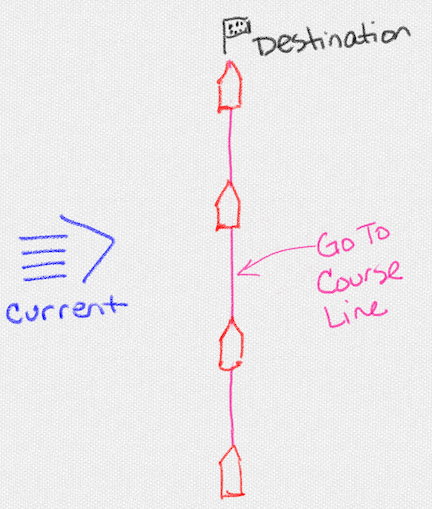
In this illustration, the boat is following the Go To course line to a specific destination and it will stay on that line (or near it) no matter how much wind or current there is.
To use the Go To feature, I tap a location on my chartplotter and then tap the Go To button. My chartplotter draws a straight line to that location. When I engage the autopilot, it puts the boat on that line (or as close to it as it can) to take the boat right to that point. It will automatically correct for current or wind as the boat moves toward the point.
The important thing to remember about Go To is that it draws a straight line and the boat will drive on that line. So if a straight line to the point crosses a sandbar or other obstacle, the boat will still try to drive on the line. For that reason, I usually use Go To for short distances or within straight channels.
Route To
For a more complex course to a point, I can use the Route To feature. It does the same thing as Go To — it takes you to a specific destination — but it can include multiple turns along the way.
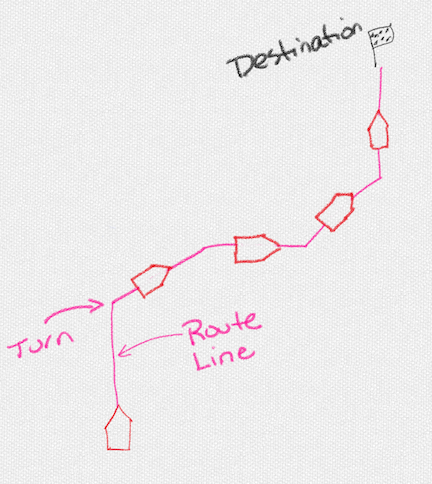
In this illustration, the magenta route line includes four turns. The boat will follow that line, making turns where indicated, to get to the destination. I didn’t draw in the current because it really doesn’t matter.
I set up a route by tapping a destination location on my chartplotter and then tapping the Route To button. This draws a thin, straight line to the point, but it’s a sort of “elastic band” line. As I drag the chartplotter’s view around, a crosshairs moves on the chart so I can add turns. I use this to draw a final course with multiple turns that avoid obstacles.
A route is time consuming to create, especially for a long or complex path. But the benefit is that you’re forced to review your entire route as you create it and the boat can drive itself on that route, making turns as necessary to get to the destination.
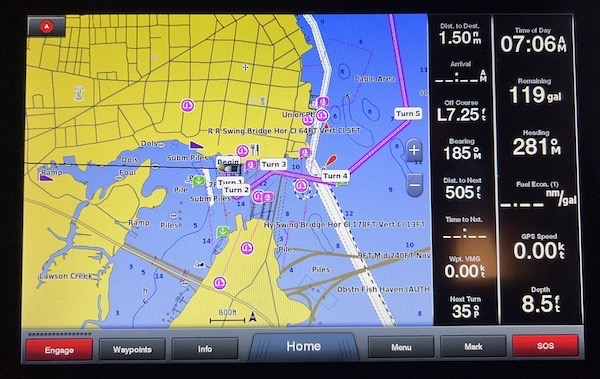
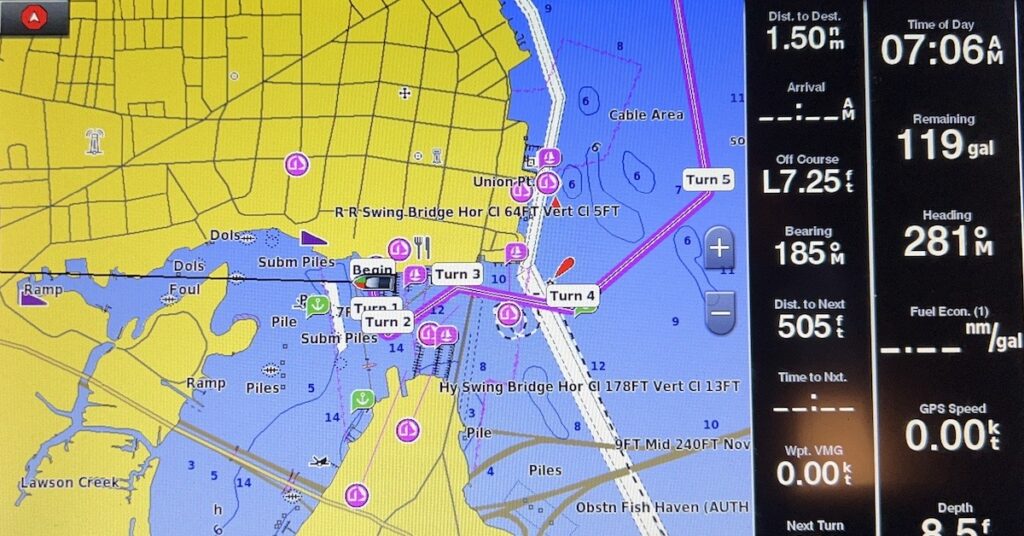
Here’s a quick route I put together this morning to illustrate what it might look like on a chartplotter. The turns are indicated. Once engaged, the boat will follow the magenta line, making each turn along the way. Although the route starts in my slip at the marina, I obviously would not engage it until I was out in the marina in open water. The autopilot would navigate to the closest point on the line and continue from there. If you’ve got sharp eyes, you can see the dashed line marking the track from my arrival. Note that I used the autopilot’s Circle pattern feature to hold on the east side of a drawbridge until it opened.
Auto Guidance
If you get lazy about manually creating your own route, you can try the Auto Guidance feature. I have. Many times.
To set this up, I tap a destination location on my chartplotter and then tap the Auto Guidance button. The chartplotter looks into its database and the preferences I’ve set for the boat’s draft (to avoid shallow water) and height (to avoid bridges). It then calculates a complete route and offers it up for review. It normally includes a list of hazards, which you can review one by one. In my experience, they’ve mostly been channel markers and buoys that the route comes close to. You can also make manual changes to the route. By the time you’ve finished reviewing the entire route created by the Auto Guidance feature, you probably could have created your own route from scratch.
I don’t bother with Auto Guidance any more. Not only has it attempted to drive my boat into land and bridge supports (rather than under the bridge), but it often tried to route me out into the Gulf of Mexico or Atlantic Ocean instead of established ICW channels. To make it even more annoying, it also emits a beeping alarm any time the boat comes within 20 or 30 feet of a channel marker — remember, that’s a “hazard.”
I think Garmin is doing a disservice to its customers by making this feature available as is and I advise people not to rely on it. But I do encourage folks to try it just to see how it works for them. If you’ve tried it, please tell me what you think in the comments to this post. Tip: I think you’ll have better success with shorter routes.
Following a Track
Another way you can use autopilot is to follow a saved (or imported) track. I’ve been doing that a lot lately. I’m kind of hooked on the Bob423 ICW tracks and I’ve even followed my own track a few times.
A track is basically a path laid down by someone with a GPS — in a boat, in this case. You probably see your track on your chartplotter screen. What you might not realize is that your chartplotter automatically saves these for a certain amount of time. You can retrace your path or someone else’s by simply following the track.
And no, you don’t need to convert a track into a route before you follow it. Just follow the track.
Doing this is a bit more involved. First, you need to get the track into your chartplotter. (And no, I’m not going to cover that here. Google it.) Then, on my Garmin setup, I tap Info > User Data > Tracks > Saved Tracks. That brings up a list of the tracks I’ve saved into the chartplotter. I find and tap the one I want and then tap Follow Track. The chartplotter asks if I want to follow it Forward or Backward — tracks are created in a specific direction. I tap the option I want. The chartplotter draws the line it will follow. (If the line is going the wrong direction, you picked the wrong option. Cancel out and try again.) I can then engage the autopilot to get on that track line and follow it.
Once set up and engaged, this looks and works just like any other route. The main difference is that there are a lot more tiny turns and you get a pretty smooth ride.
As I travel up the Atlantic ICW, I’ve been following the Bob 423 track every day. It really reduces my navigation workload while helping me to avoid most shoaling.
Autopilot is not the Captain
No matter which autopilot feature you use — and, like me, you might use multiple features throughout your cruising day — you must remember one very important thing: you are the captain. You are responsible for the safe operation and navigation of your boat.
Just because autopilot is steering the boat doesn’t mean you can go take a nap. You (or someone with good eyesight who is capable of controlling the boat) must stay at the helm or within reach of the controls and watch what’s going on around the boat. Look for obstacles in the water like crab traps or logs or other debris. Look for oncoming or intersecting traffic. Look for uncharted channel markers and indications of shoaling.
Say you’re cruising along with Heading Hold keeping you pointed in the right direction. Now say you spot a crab trap or log in your path. What do you do?
Well, if you have time, you can use the Port or Starboard button on the autopilot to change course away from the obstacle without actually disengaging the autopilot. All you’ve done is changed the heading.
Or you can put the autopilot into standby and hand steer away from the obstacle.
Or, if you spot it at the last minute and there’s no time to adjust the autopilot or put it on standby, you can simply grab the wheel and steer hard away from the obstacle. Your input on the steering wheel will override what the autopilot wants to do. Just keep in mind that when you stop steering, the autopilot will attempt to get right back to work.
The same goes with using any other autopilot feature discussed above. I’ve discovered that blindly following the Bob423 tracks could take me over crap traps and, in one instance, into a channel marker. While I’m sure these obstacles weren’t there when Bob423 made the track, they were there the day my boat’s autopilot system followed his track. No track or route is perfect — you must remember that!
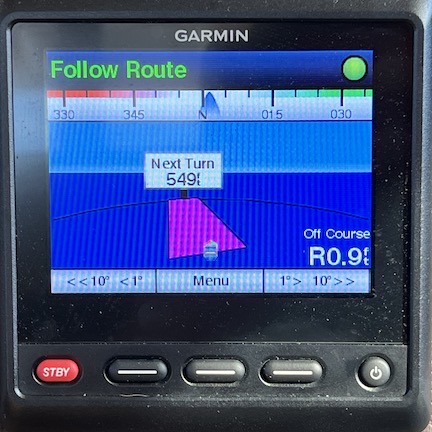
Here’s what the autopilot screen looks like when I’m following a route or track. Pressing the Port or Starboard buttons will switch to Heading Hold at the heading you set.
Even when following a route or track, you can always use a Heading Hold button on the autopilot to alter the course to a new heading — which will disengage the route or track you might be following. You can always put the autopilot on standby. And you can always just steer hard away from a problem.
The important thing to remember is that the autopilot can’t see what’s around the boat. It’s just doing what you told it to do. You must supervise its operation at all times and be prepared to disable or override it when necessary.
Any Questions?
I hope this clears up any confusion readers might have about different autopilot features. If you have any questions, please put them in the comments for this post.
The way I see it, autopilot makes my job easier. It doesn’t take away my responsibility to be in control of the boat. In a way, it’s like having a new crew member who needs supervision. In fact, I’ve given mine a name: Otto.

While I knew 99% of this information, I am still very impressed with your writing and explanation. Very easy to understand. Great job!
Thanks very much, John. I appreciate your kind words. I wrote technical books (about using computers) in my second career so something like this is right up my line. I just wish I did a better job on the illustrations.
“YOU are the captain” reminds of (what I hope was!) a joke from the 70’s when cruise control was 1st coming to vehicles. Supposedly someone engaged cruise control, and went to the back of his van to get a beverage. The result was, well, as you’d expect!
So a really nice and informative discussion, Maria. Kudos. And yes, auto-pilot functions, regardless of type of transport, demand that the PIC pay attention to what Otto is doing, and your surroundings. But man does it make travel easier.
Oh, and Otto as your AP’s name?? Classic and priceless!
Thanks very much. It really surprised me how few people understood how these features differ and work.
I also think that a lot of folks don’t use autopilot because they’re afraid of giving up control. They’re not giving control at all. It’s easy to take over when you need or want to.
Excellent information presented in an easy to understand format. Thanks !
Thanks very much! Now if only I could create better graphics!